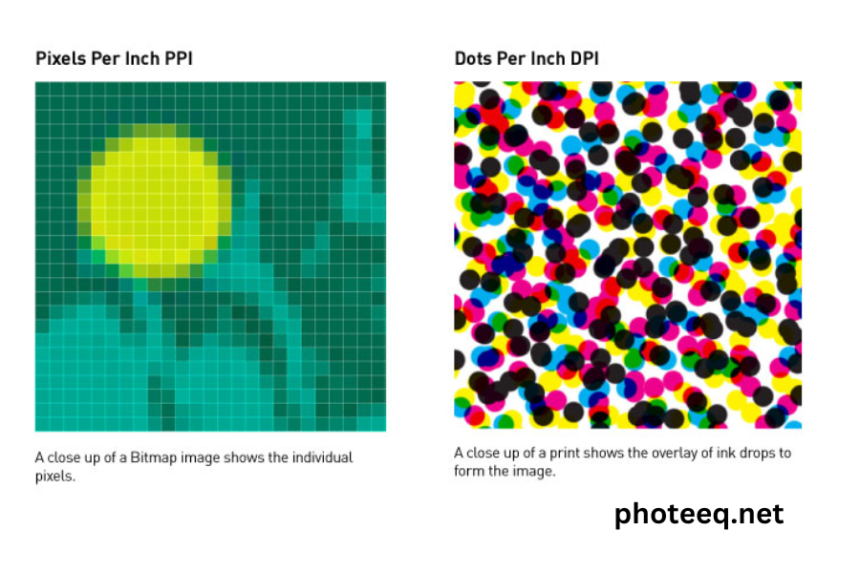
Dots per inch (DPI) is a measurement used to determine the resolution of an image or the quality of a printed document. In the world of photography and digital imaging, DPI refers to the number of dots or pixels that can fit into one inch of an image. The higher the DPI, the more detail and clarity the image will have.
In the context of Photeeq, a cutting-edge photo editing software, understanding DPI is crucial for achieving the best results in your editing process. When you import an image into Photeeq, the software analyzes the DPI to determine the image’s size and resolution. This information is essential for making precise edits and adjustments to your photos.
The importance of DPI in Photeeq
Accurate DPI settings are vital in Photeeq to ensure that your edited images are of the highest quality. When you adjust the DPI in Photeeq, you are essentially controlling the level of detail and sharpness in your photos. Whether you’re planning to print your images or share them digitally, having the correct DPI settings will make a significant difference in the final output.
High DPI settings are especially crucial for professional photographers and graphic designers who rely on Photeeq for their work. For example, if you’re capturing images for a magazine spread or a billboard advertisement, having a high DPI will ensure that your images are crisp and clear, even when blown up to larger sizes.
How to adjust DPI in Photeeq
Adjusting the DPI in Photeeq is a straightforward process that allows you to optimize your images according to your specific needs. To adjust the DPI in Photeeq, follow these simple steps:
- Open Photeeq and import the image you want to edit.
- Go to the “Image” menu and select “Image Size.”
- In the “Image Size” dialog box, you will find the DPI setting. Adjust it according to your desired resolution.
- After making the necessary changes, click “OK” to apply the new DPI settings to your image.
Common misconceptions about DPI in Photeeq
There are several misconceptions surrounding DPI in Photeeq that can lead to confusion or misinterpretation. Let’s debunk some of the common myths:
Myth 1: Higher DPI always means better quality: While increasing the DPI can enhance the level of detail in an image, it doesn’t automatically guarantee better quality. Factors like the original image resolution and the capabilities of the printing or display device also play a significant role in determining the overall quality.
Myth 2: You can increase the DPI of a low-resolution image to improve its quality: Unfortunately, this is not true. DPI is a measure of the image’s resolution and cannot magically create detail that doesn’t exist in the original image. If you start with a low-resolution image, increasing the DPI will only make it larger but won’t improve the quality.
Myth 3: DPI affects the image’s color accuracy: DPI primarily relates to the resolution and level of detail in an image. It doesn’t directly impact color accuracy. Color accuracy is influenced by factors such as color profiles, calibration, and color management workflows.
Tips for optimizing DPI in Photeeq
To optimize the DPI settings in Photeeq and get the best results, consider the following tips:
- Know your output medium: Determine whether you’re planning to print your images or share them digitally. Different output mediums may require specific DPI settings to achieve optimal results. For printing, consult with your print service provider to ensure you’re using the correct DPI for their equipment.
- Start with a high-resolution image: To have more flexibility in adjusting DPI, begin with a high-resolution image. This will give you more room to make edits without sacrificing image quality.
- Balance DPI and file size: Increasing the DPI will result in larger file sizes. Consider the storage limitations of your device or platform before setting the DPI too high. Find a balance between quality and file size that works for your specific needs.
- Use Photeeq’s built-in presets: Photeeq offers preconfigured DPI presets for various output mediums, such as web, print, and social media. Utilizing these presets can save you time and ensure that your images are optimized for specific purposes.
Best Practices for Using DPI in Photeeq
To make the most out of DPI in Photeeq and achieve professional-looking results, follow these best practices:
- Maintain a backup of your original image: Before making any DPI adjustments or edits in Photeeq, always keep a copy of the original image. This allows you to revert back to the original if needed.
- Experiment with different DPI settings: Don’t be afraid to experiment with different DPI settings to find the ideal balance between quality and file size. Some images may require higher DPI, while others may not need such high resolutions.
- Regularly calibrate your monitor: To accurately assess the impact of DPI changes, ensure that your monitor is properly calibrated. This will help you see the true colors and sharpness of your edited images.
- Consult with professionals: If you’re unsure about the optimal DPI settings for a specific project or need expert advice, don’t hesitate to consult with professional photographers, graphic designers, or printing specialists. Their expertise can provide valuable insights and ensure that your images are of the highest quality.
Troubleshooting common DPI issues in Photeeq
While Photeeq is a powerful tool for editing images, you may encounter some common issues related to DPI. Here are a few troubleshooting tips to help you overcome these challenges:
- Blurry or pixelated images: If your images appear blurry or pixelated after adjusting the DPI, it’s possible that the original resolution was too low. Try starting with a higher resolution image or reduce the DPI to a more suitable level.
- File size limitations: Some platforms or devices may have limitations on file size, especially when sharing images digitally. If you’re experiencing issues due to large file sizes, consider reducing the DPI or compressing the image without compromising too much on quality.
- Inconsistent colors: If your printed images have inconsistent colors compared to what you see on your screen, it may be due to color management issues. Ensure that your Photeeq and printer are using the same color profiles and calibration settings.
Conclusion
Understanding and effectively utilizing DPI in Photeeq is essential for achieving high-quality, professional-looking images. By adjusting the DPI settings appropriately, you can control the level of detail, sharpness, and overall quality of your edited photos.
Remember to consider the output medium, balance DPI and file size, and experiment with different settings to find the optimal resolution for your specific needs. By following the tips and best practices outlined in this article, you’ll be well-equipped to make the most out of DPI in Photeeq and take your photo editing skills to the next level.


